Sunday, 12 January 2014

Millionaires Shortbread (Chocolate/toffee shortbread)

This lovely bake comes from a recipe book which they have at my Grandmas church. I actually found it quite challenging to get the right consistency for the toffee as it took a lot longer than i thought, but i got there in the end!


I couldn't cut them very well, so i apologise for the mess!

*pre heat oven to 160*/Gas mark 3*

Ingredients

4oz butter/margarine (i used stork!)

6oz self raising flour

4oz caster sugar

1tbsp of golden syrup

1 small can of condensed milk

6oz of milk or dark chocolate (I used milk)

Method
Shortbread:

Rub 4oz butter and the 6oz self raising flour together until it resembles fine bread crumbs

Add the 2oz caster sugar and gently mix together

Next pour the mixture into a lined greaseproof papered dish. This recipe suggests using a swiss roll tin, but i didn't have one, so any dish/tin that's at least 1.5 inches deep will do. 

Bake for 25 mins

Toffee: 

Stir 2oz butter or margarine, 2oz sugar, 1 tbsp syrup and 1 small can of condensed milk together in a pan until the sugar dissolves

Reduce the heat and cook SLOWLY until the syrup begins to turn a light brown 

Cool shortbread and spread the toffee over

Chocolate:

Melt 6oz of chosen chocolate in a pyrex glass bowl over boiling water and keep mixing until completely melted

Pour over toffee

Cut into small fingers when cool, as its quite rich! (and delicious)


Thursday, 19 December 2013

Cornflake Tart - A Childhood Favourite!

If you ever had school dinners as a child, you may very well remember this dish! Up until about 2 months ago, i hadn't had this dessert for about 9 years and one day, me and my sister thought we'd have a look online for a similar recipe! I found this particular recipe and thought it worked quite well and the dish tasted just as i remembered! so happy days.... 


*Pre-heat oven to 200*C/ Gas 6*

Ingredients


115g golden syrup

85g of cornflakes (I found that Morrisons own brand cornflakes worked well, but you can opt for the more expensive Kellogs cornflakes if you wish)

55g Butter

25g soft brown dark sugar

1 small pinch of salt

100g Strawberry jam, slightly warmed

Method

Line the quiche dish (or flan dish with loose bottom - which is what i used and found easier) with the shortcrust pastry 

Trim off the excess pastry around the edges and prick the base of the pastry case with a fork

Place a sheet of foil into the pastry case and pour in enough baking weights/dried beans to fill the base. Bake in preheated oven for 20 minyutes or until lightly golden. (You may need to remove the foil and beans and place back into the oven for 5 minutes)

Whilst the pastry is in the oven, put a large saucepan over the heat, and melt the butter, sugar, golden syrup and salt together.

Once the sugar has dissolved, gently fold in the cornflakes without crushing them and make sure all the cornflakes are covered in the syrup.

Remove the pastry from the oven and remove the weights

Spoon in the cornflake mixture and level off gently with a spoon/spatula

Bake the tart for an additional 5 minutes 

Remove from the oven and allow to cool slightly as the cornflakes will be all gooey

To make it taste extra delicious, serve with hot custard!! 


Chocolate Cake with Nutella Chocolate Buttercream Icing

Chocolate cake is my ultimate fave, and i have put a slight twist on this one by adding Nutella to the icing. Personally, i found normal chocolate icing a bit to sweet and i found that the nutella breaks the sweetness a bit and also makes the icing firmer which i prefer! The pictures below show the cake which i made for my 19th birthday and as you can see, ive just added some raspberries to the top to add a fresher taste to the cake and i think the flavours go really well together but you could be really chocolatey and add chocolate sprinkles or broken up Cadburys flake bars if you wish!


The ingredients to this cake are the same as the victoria sponge but with the addition of cocoa powder (NOT hot chocolate powder!!)

Ingredients

100g/4oz self raising flour
2 level tablespoons cocoa powder
100g/4oz butter
100g/4oz caster sugar
2 standard eggs
1 Teaspoon of baking powder

For the nutella buttercream

100g/4oz butter
200g/8oz sifted icing sugar
splash of milk
2 heaped spoons of Nutella (or more to taste)
1 tablespoon of cocoa powder

Method

Line two 18cm/7in sandwich tins 

Cream the butter and sugar together until very pale in colour, light in texture and fluffy

Beat in whole eggs, one at a time (this is very important), sifting in a bit of flour and 1 tablespoon of cocoa powder with each egg

Gently fold in the rest of the sifted flour 

Add in 1 teaspoon of baking powder for extra uuumffft!

*With this bake, it is best to get as much air in the mixture as possible (which will result in a lighter, more enjoyable cake!) so doing a gentle figure of eight movement will work well, as well as lifting some of the mixture up with the spoon as you mix*

Transfer the mixture to the prepared tins and smooth the tops of the evenly distributed mixture with a knife

Bake in the centre of the oven for 25-30 minutes (or until well risen, golden brown and firm - as shown in the picture above)

Leave in the tins for 2-3 minutes then turn out onto a wire cooling rack. Strip off paper and leave until cold.

For the Nutella chocolate buttercream

Beat the butter until soft

Gradually beat in the sugar alternatively with milk

Sieve in the 1 tablespoon of cocoa powder

Melt the Nutella down in the microwave for 15 seconds on high or until slightly softer, then add to the mixture

spread in the middle of the cake, and on top

I was given a tip by the baker Luisa Zissman who appeared on the BBC's Apprentice in 2013, and she said that when it comes to butter cream, it should be a 2:1 ratio of icing sugar to butter. So if you require less buttercream, you can follow these measurements. :)


*If you are wanting to make bigger cakes, with perhaps more layers and therefore require more mixture.. just remember all the mixture should be equal to the weight of how many eggs you use. So with each egg typically weighing 2oz, using 3 eggs would mean all ingredients should weigh 6oz*

Wednesday, 18 December 2013

Homemade Pink Lemonade

This tasty treat is a little out of season (more suited to the Summer months) but its so delicious/ refreshing and easy to make, i just had to include it in my blog of tasty temptations now! I first made this drink summer 2013 with my friends and we loved it, so i made it again for my birthday in the July, and unsurprisingly, my family loved it too. 


Ingredients

140g caster sugar
8 lemons
150g raspberries
1/1.2L of boiling water (1.2 litres may reduce the strong flavour of the drink)
Ice to serve

Method

Firstly, peel the zest off all the lemons (like you would do a potato) and remove as much of the white pith as possible from the peeled zest

Then cut the lemons in half and juice them all

Mix the juice of the lemons, the peeled zest, the sugar, raspberries and 1 litre of boiling water together in a bowl

Let the mixture cool, then press the mixture through a sieve with the back of a spoon 

If this drink is too bitter or 'lemony' for you, you can add more sugar to the drink

Pour the mixture into jugs (or empty juice bottles) and put in the fridge to cool properly 

To serve, add a few lemon slices, raspberries and lots of ice.

Yummy!!


'Millie's Cookies' Style Chocolate Chip Cookies!

The secret to this recipe is the use of the two different type of sugars.. but ssssssh! 


*Pre-heat oven to 180*C for a fan oven*

If you're hoping for a gooey Millies cookie style cookies, then I recommend to bake the cookie for 7 mins. If you like your cookies more golden with a slight crunch, I recommend 10-15 mins. 

Ingredients 

125g Butter
75g Light Brown Soft Sugar
100g Caster Sugar
1 Egg, Lightly Beaten
1 TSP Vanilla Extract
225g Self-Raising Flour
1/2 TSP salt
200g Chocolate Chips (Or what i found that worked the best was using one and a half bars of smashed/ cut up little pieces of supermarket own brand chocolate (100g each), which are as cheap as 30p!)

Method

Firstly, cream the butter and the sugar together until light and smooth

Next, add in the lightly beaten egg and vanilla extract

Sift in the flour/ salt and lightly fold all the mixture together (a figure of 8 movement usually works best!)

Sprinkle in the broken pieces of chocolate so the cookies will taste extra good, then mix it in

At this point you should prepare your baking tray and line it with greaseproof paper so the cookies don't stick to the tray!

Take some mixture and roll it in your hands into walnut sized balls, then place on the greaseproof paper. I recommend placing around 6 balls of cookie dough mixture at a time on 1 tray.

Place in the oven on the middle shelf

After 7-15 minutes of being in the oven, remove the tray and allow the cookies to cool and harden a little before lifting them off and placing them on a cooling rack

Repeat Process, and enjoy!

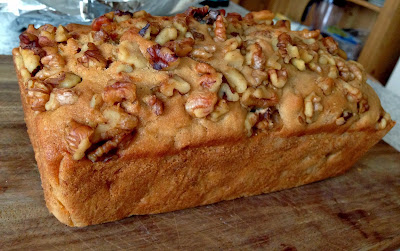
Banana and Walnut Loaf

This is a really delicious recipe that I have taken from BBC's Good Food '101 Cakes & Bakes'. I am including it in my blog as it's a bake I find really tasty and would definitely recommend others to bake it also! It's one of those cool recipes where you could swap a few ingredients for a slight change. For example, if you aren't the greatest fan of nuts (like many aren't!) you could swap the walnuts for chocolate or perhaps even chunks of toffee?


*Pre heat oven to 180*C/Gas 4/ Fan oven 160*C*

Ingredients

100g/4oz Butter, softened
140g/5oz light muscovado sugar
2 eggs, lightly beaten
100g/4oz walnuts, chopped
2 ripe bananas, mashed
2 tbsp milk
225g/8oz self-raising flour

Method

Butter and line a 1kg/2lb loaf tin

Cream the butter and sugar together until light and smooth

Add the eggs

Add 3oz/75g of walnuts and fold into the creamed mixture

Add the mashed bananas and milk

Fold the mixture together (again using the figure of 8 movement)

Next, fold in the flour

Spoon the mixture into the greasproof paper-lined tin 

Sprinkle over the remaining 1oz/25g of walnuts

Bake in the oven on the middle shelf for 55-60 minutes until risen

Stand for 10 minutes, then turn out, remove the lining paper and cool. 

*Serves 12*

Classic Victoria Sponge

This is one of my favourite cakes to eat and bake as its appreciated by all and it's one of the first cakes I ever made (aside from tom and jerry cakes as a child!) I have taken this recipe from The Dairy Book of Home Cookery which is a rather old book as its from 1977, but nevertheless it makes me beautiful cakes! 


*Pre-heat oven to 180*C/350*F/Gas No. 4*

Ingredients

100g/4oz softened butter
100g/4oz caster sugar
2 standard eggs
100g/4oz self-raising flour, sifted
1 teaspoon of Baking powder

Method

Line two 18cm/7in sandwich tins 

Cream the butter and sugar together until very pale in colour, light in texture and fluffy

Beat in whole eggs, one at a time (this is very important), sifting in a bit of flour with each egg

Gently fold in the rest of the sifted flour. 

Add in 1 teaspoon of baking powder for extra uuumffft!

*With this bake, it is best to get as much air in the mixture as possible (which will result in a lighter, more enjoyable cake!) so doing a gentle figure of eight movement will work well, as well as lifting some of the mixture up with the spoon as you mix*

Transfer the mixture to the prepared tins and smooth the tops of the evenly distributed mixture with a knife

Bake in the centre of the oven for 25-30 minutes (or until well risen, golden brown and firm - as shown in the picture above)

Leave in the tins for 2-3 minutes then turn out onto a wire cooling rack. Strip off paper and leave until cold.

*Serves about 8 portions depending on how greedy you are!*